Good day everyone!
What to do and what to do if your pet’s fur is absolutely everywhere, and the fight against it is in vain? Sometimes it seems easier to teach the “culprit” himself to clean up after himself with a vacuum cleaner!
No, you don’t have to surrender to the “wool lawlessness”! Believe me, there is a way to defeat him! This is a normal coat combing. Yes, it helps! It’s just that the cat hair comb must be correct, which depends on its design and purpose. Let's talk about this in detail.
Is there an alternative to a scratching post?
It will not be possible to wean a cat from the “bad” habit of sharpening its claws. This is not a whim, but a vital necessity. If you deprive the animal of the opportunity to carry out this procedure, then soon it will begin to feel great discomfort when moving, and then painful sensations will appear. The reason is the ingrowth of claws into the paw pads.
Some owners purchase nice anti-scratch caps. Some relatively docile pets agree to such a “pedicure”, others fight with them to the last. In addition to the inconvenience for animals, these caps have another disadvantage - their high price. Therefore, a cat exercise machine for “legs” is the most reasonable solution for owners who truly care about their little “child”.
I want to forget about radical methods of getting rid of claws once and for all, since the animal is deliberately turned into a disabled person. The owners who resort to them can immediately be classified as those people who are called “fanatics.”
Possible types for needlework
There are many varieties of such useful claw tools. They differ from each other in the type of installation. The choice of owners should depend on the “bad” habits of their pet.
Wall structures
This scratching post is a flat board that is attached to the wall. Usually it is covered with jute or sisal. This option is optimal for those owners whose “criminals” have made wallpaper in one specific place or several at once a constant target.
There is another original subtype of wall-mounted flat scratching post - a corner one. It can be installed on internal or external wall joints. Due to the two planes located together, its size can be reduced, which allows you to get a complete essential item for even the smallest apartments.
Both a simple flat structure and a corner scratching post are often made multi-story - with several platforms or hammocks that serve as a resting place and also as an observation post. This creation will appeal to pets who love to keep a watchful eye on what is happening from cabinets, the backs of upholstered furniture or tables.
This product has advantages over other types. In this list:
- minimum space occupied by it;
- the ability to install where it is most convenient;
- no risk of the scratching post falling, which can be very frightening, especially at night;
- a good chance at first to do without wall repairs, since this scratching post will hide from view those areas of wallpaper that have turned into unsightly rags;
- low costs for self-production.
There is a downside - it is rigidly attached to the wall, which will create difficulties if you have to move the cat's household item to another place. But this disadvantage is not such if the cat has a permanent place for procedures and does not want changes.
Floor scratching posts
This option is suitable for those apartments where horizontal surfaces are subject to torture, and the walls are intact. In this case, it is better for owners to prefer one of the following varieties.
- Flat. This is the simplest claw board - a board with a simple flat or inclined surface. As a rule, it is wrapped in sisal. Such designs are compact, lightweight, and therefore convenient because they can be moved or transported to any place.
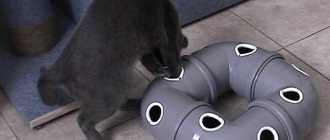
- Having curves. Wave-shaped scratching posts will help cats combine business with pleasure, because with such a model you can not only sharpen your claws, but also play around. These products will require more space in the room, and they are also somewhat more difficult to manufacture.
- Cardboard. This “home savior” is the most impractical, as it is made from cardboard blanks that are glued together. The disadvantages are the fragility of the product and torn pieces of cardboard, which will have to be picked up constantly.
Platforms with pillars
These scratching posts are the most popular cat products. The main thing when choosing a model is the height of the column that is suitable for the animal. Half a meter is enough for small creatures; an adult cat needs 70 or more centimeters. Platforms with “columns” are divided according to the degree of functionality, and therefore the complexity of manufacturing.
- A column with a platform. The simplest option, compact and economical. Such store-bought scratching posts are covered with jute, which is not particularly durable.
- Angular. They also won’t take up much space, but will protect the corners if your pet has a bad habit of tormenting them.
- Sites with a column and a house. These are more serious structures that allow the pet to settle on them for a long time, if not forever.
- Multi-level complexes. They include several pillars, between which hammocks are stretched, there are tunnels, ladders, and rest areas. This is the most labor-intensive option if the operation “Do-it-yourself scratching post using improvised means” is planned. It's not suitable for a debut.
To make the right choice, you just need to know your pet’s bad habits, and what owner can remain in the dark if his apartment or house suffers? For those creatures who love to damage carpets or upholstered furniture, products made from jute, carpet, and sisal are suitable. Cats that do not pass by cardboard should receive the same scratching post as their property. For ardent wall lovers, carpet, jute or sisal are also suitable.
What models are there?
It would seem that there is nothing complicated about it: bring a log or board from the street, put it against the wall - and you don’t have to worry about the safety of the furniture and wallpaper. In reality, everything is more complicated. Each cat has its own character and habits. Therefore, you need to select a scratching post individually, after first observing your pet.
There are several varieties suitable for Maine Coons:
- Scratching post-bed.
- Column.
- Vertical scratching post mounted on the wall.
- Playhouse.
Requirements for a homemade design
Store-bought copies often do not shine with practicality. The main drawback of many models is instability. Therefore, the first important criterion for a DIY scratching post is its reliability. The design must also:
- not too bulky, which is especially necessary for small apartments;
- be durable - very durable, made of high-quality materials;
- have a nice appearance, since it will not be the last element of the interior.
Some purchased scratching posts may meet these requirements, but these models are a direct path to emptying your wallet. Their other drawback is synthetic materials, the “aroma” of which delicate cat noses are not able to get used to.
The naturalness of all materials is another mandatory condition if the owners want the pet not to reject what was done with backbreaking labor. You need to use wood, natural materials, cardboard packaging, burlap, twine.
A simple cardboard scratching post
It is better to start getting acquainted with this type of needlework with the simplest models. This is doubly important if the tailed “adult child” has not yet seen such a structure. The cheapest and easiest way is to make a cardboard structure. To create it you will need to have on hand:
- corrugated cardboard or cardboard;
- stationery knife;
- adhesive tape or PVA;
- piece of fabric;
- thick paper.
The whole process takes little time, it goes like this:
- The boxes are disassembled, then parallel lines are drawn on the surface of the cardboard, the distance between them is at least 10 cm, it is better to take a larger value. Then the strips are cut off.
- They make the middle of the scratching post: tightly twist the first element, straighten it, coat it with glue, and roll it up again. An alternative is gluing with adhesive tape.
- The second element is screwed onto the glued core and connected with glue or adhesive tape. They do the same with the remaining strips, the last of them is attached very securely.
- Wrap the resulting circle in a piece of fabric and fasten it from below (for example, by basting in several places). This step is optional.
- The semi-finished product is placed on a sheet of thick paper and the perimeter is outlined. Having cut out a circle, it is glued to the bottom of the product.
This cardboard structure can be replaced by a regular cut of a tree, which is the most favorite and familiar scratching post for a domestic predator. Another attractive option is a small, attractive tree stump.
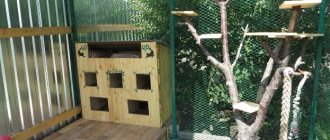
DIY kitty house
A scratching post house for a pet is already aerobatics. In fact, this structure turns into a gaming complex, so the owner’s task is to take into account all the details at the design stage. But, as you know, if the handles are golden, it doesn’t matter where they come from!
Required building materials:
- OSB boards (8 mm and 12 mm). They can be replaced with plywood or chipboard sheets;
- a large piece of fabric, faux fur, carpet;
- self-tapping screws;
- hot glue gun;
- staples;
- metal pipe (or several pipes, depending on the final design);
- several skeins of hemp or jute twine;
- corners for furniture.
Required tools:
Tape measure, pencil, jigsaw, screwdriver, drill, compass, construction stapler, hammer, scissors, heat gun, knife, hacksaw, screwdrivers.
- Drawing a diagram
- We begin to cut OSB boards or chipboard boards.
In the video you can see how to draw patterns for a scratching post house.
- We assemble the patterns and the pipe(s) into a single whole, fasten it like a man and invite the cat to admire the unprecedented beauty.
- Wrap the posts with jute, carefully fixing its ends.
- Cover the remaining surfaces with fabric or faux fur; you can mix materials.
- Hang a decoy toy.
- Remember catnip!
Wooden floor scratching post
This product is also not difficult to manufacture. For this scratching post you need to prepare:
- wooden board;
- two bars for the sides;
- drill and drill bits;
- self-tapping screws;
- stapler;
- leg-split.
The operation is as fast as the previous option:
- First of all, screw the side bars-legs to the board with self-tapping screws (2 on each side). First, small holes are made in the wood with a drill for fastening. Their diameter is smaller than that of self-tapping screws.
- A through hole is drilled in the board - in opposite corners. A twine is threaded into the first of them, and a knot is tied at the end of it.
- Start winding the twine tightly. The end is secured with a stapler. The same operation is carried out on the opposite side of the product.
There is no need to leave any free space between the windings, but this decision must be made by the pet owners themselves.
Frequent errors in manufacturing and assembly
- Often, when making a scratching post, some mistakes are made, the most basic of which are insufficient stability, incorrect materials, ill-conceived design.
- Any structure must be balanced and securely screwed. If it falls, the cat will get scared and stop using it.
- Purchasing the cheapest ready-made scratching posts. For their manufacture, the most fragile, low-quality materials are used, which, with frequent use, quickly become unusable. Such products can lead to injury to the cat, its paws, and claws.
- The owner thinks that the cat itself should understand the purpose of this new object. She needs to be taught, shown what the animal should do with her, and to interest the pet in every possible way.
- Wrong sizes. When developing drawings and diagrams, the owner does not take into account the size of his animal, its habits, habits, and character. The pet may simply not like such an item, and sometimes it does not correspond to its dimensions or weight.
A house for a Maine Coon should be larger than, for example, a house for a British or other breed.
The animal cannot use it comfortably. It is easier to train a small kitten than an adult who is used to sharpening her claws elsewhere. Such an animal must get used to new furniture gradually.
Playground with a pillar for the baby
To build a mini-area with a scratching post for a kitten, you need to stock up in advance:
- wooden board for the base;
- jute or sisal;
- a piece of carpet;
- nails;
- with a knife;
- feathers, woolen thread;
- empty tin cans (of the same or different diameters) for the column, their total length should not exceed 50 cm;
- silicone glue.
They make a scratching post-toy for a kitten like this:
- They cut out the carpet for the platform board. They do this by leaving a reserve. Glue the material, place weights on it, and wait for it to dry.
- A column is made: the cans are glued to each other, then to the platform, and a weighting agent is placed on top of the column.
- After waiting for the can structure to dry, cover it with carpet. Another way is to first glue the carpet to each can, then assemble the whole structure.
- The middle part of the column is generously smeared with glue, then immediately wrapped with the selected cord.
After the scratching post has dried, a toy made of thread and feathers is attached to the top of the post. Any purchased “irritants” that allow you to reliably stick to them are suitable as decorations.
Scratching post for adults
In this case, tin cans are not enough, so you will need:
- timber, whose length is 70-100 cm, and the minimum width is 80 mm;
- wooden base, round or square, its thickness is 30-40 mm;
- self-adhesive film (or thick fabric);
- plastic cap for pole;
- thick rope;
- drill, drill bit;
- glue, screws;
- stapler
It would be hard to call this work extremely complex:
- First they work on the platform for the post. Draw 2 perpendicular lines passing through the center of the workpiece.
- The timber is placed at the intersection point and outlined around the perimeter with a pencil. The base is connected to the post with glue, then reinforced with self-tapping screws screwed into the lower part of the support.
- The future scratching post is covered with fabric or decorated with self-adhesive film.
- A rope is fixed at the base of the beam with a stapler, or simply tied with a knot.
- The pole itself is coated with glue, then the rope is wound tightly. Its upper end is also secured with a stapler.
- The top of the scratching post is decorated with a cap.
Such a scratching post will become a real decoration of any room if the rope is pre-painted in different colors. However, the main thing is that the future owner/owner of the product likes such decoration.
Corner wall scratching post
These structures are hung in such a way that, stretching out to its full height, the cat is not able to reach its upper edge. A simple wall design will not raise any questions for anyone, but a corner one will require a little more effort. In order to get the desired corner protection, you will need:
- wooden board (length - 1.2 m, width 200 mm);
- a piece of carpet;
- glue - PVA (carpentry);
- hammer (mallet);
- sandpaper;
- stapler;
- corners (minimum 4, maximum 6-8);
- dowels (length 30 mm, diameter - 6 mm);
- drill, drill bit (6 mm), jigsaw.
To obtain a scratching post, follow the following algorithm:
- Saw the board in half. The edges of both parts are sanded.
- The workpieces are connected with dowels, for which holes are drilled in both parts corresponding to the diameter of the fastener and ½ of their length. In one board they are made from the end, in the other - from the edge of the front side. The hole pitch is 80 mm.
- Dowels are hammered into one of the blanks, having previously coated them and the holes with glue. Then it is applied to the end and hammered fasteners, and the workpieces are tightly connected, after which work with wood is stopped until the glue dries.
- Cut out a piece of carpet so that there is enough material left to fold it onto the ends and inside of the scratching post.
- The part that will come into contact with the planes of the boards is coated with glue and glued to the product. Along the edges, the material is stapled to the inside of the scratching post.
- The scratching post is fixed on the wall using furniture corners, which are secured with self-tapping screws. You can take only 4 pieces of corners - 2 fasteners on top for each plane, but if the cat is a big eater, then it is better to take a larger number.
A simple wall model is made in a similar way, but its home production is not so difficult, so it is quite possible to follow this scheme of work. The only difference is the “solitude” of the board, and the fact that there is no need to connect the blanks with dowels and glue.
“Cat's joy”
This is often called a furminator (a professional tool for salon care!) - a “miracle comb” with a comb-shaped, steel, durable blade and an ergonomic handle, which is also suitable for home use.
According to reviews, it is liked not only by cat owners for its high efficiency - it removes up to 90% of dead cat hair, but also by the pets themselves for its effect on the skin and fur coat.
There are two types: deluxe with an injector button for throwing hair off the comb and classic without this option - the blade is cleaned manually; There are differences in design and material, but not quality(!).
They are selected individually according to the width of the comb and the height of the teeth. The seller's advice or a veterinarian's consultation will help you. And follow the instructions!
Furminator brand “FURminatjr deShedding” (1300-2100 RUR) is the best! Its popular analogues: HelloPet (1000 rubles), TRIXIE (up to 900 rubles), Dele (350 rubles); They are a little lower quality.
What is considered before “creating to create”?
If you do not pay attention to some little things that seem insignificant, then you may not expect the effectiveness and attractiveness of the cat product. Therefore, it is worth paying attention to the following nuances:
- For adult tailed “ladies and gentlemen,” the ideal post height is 1 meter. If you are planning beds or houses, then it is quite possible to raise them even higher. The optimal width of a scratching post is 80-100 mm.
- If there are several predatory pets in the house, then the beds (when there are several of them on one structure) should be located at the same distance from the floor, otherwise the subsequent operation, code-named “Who’s in charge,” can be bloody.
- When a cat is alone for a long time, it is imperative to provide the scratching post with toys.
A do-it-yourself scratching post made from improvised means is a good solution if the owners care about the well-being of their favorite domestic predators. And it doesn’t matter how “sophisticated” the first model is. The main thing that is expected of her is that the furry “owner” of the house likes her. In this case, peace in the house and its safety will be ensured.
One of the “recipes” for a scratching post can be seen in the following video:
Scratching materials
But no matter how wonderful the design is, no matter how much work and soul is put into it, if the pet doesn’t like the material from which the device is made, you won’t be able to lure it even with catnip.
Cats are very sensitive to electricity. If at least once during the process of tidying up its claws the cat experiences an electrical discharge emanating from the material, it will no longer even come near it.
Fabric and upholstery
Sisal is ideal for scratching.
The model can be any, but the material must be natural . Metal fasteners must be hidden. The material on which the claws will be sharpened must be made of fiber so that it can be caught, but dense enough so that it does not get caught and does not tear the claw.
Coarse furniture fabrics are suitable, carpet is used on the reverse side, drape, tapestry, old overcoat, cloth for gaming tables, burlap, felt, felt. Suitable ropes for wrapping a scratch are jute hemp, rope, and any thick rope made of natural fiber. The main thing is that it is strong. For example, cotton rope is not strong enough for a cat's claws and will need to be constantly replaced.
Corrugated cardboard
Corrugated cardboard scratcher.
In the absence of men and tools, you can also make a scratch from corrugated cardboard, which is used for packaging. There is no limit to the flight of fancy here. It can be of any shape and size.
The necessary materials are PVA glue without harmful impurities and odor, scissors and cardboard.
You can simply cut the fabric into strips, weave a tight braid, wrap it in a spiral, attaching a rustling but strong ribbon or a toy on a rope inside. Secure the spiral with strong threads. There you go. You can put it on the wall, you can put it on the floor: it’s warm, you can play, you can sleep, you can clean your claws.