Share on social media networks:
The cat is a predator, so it spends a significant part of its time climbing trees. Living conditions for a small steeplejack in a city apartment are much poorer than, for example, in rural areas. In the city, a domestic cat lives a satisfying and comfortable life, but it sorely lacks its own space. Therefore, caring owners purchase sets of furniture and accessories for their pet: shelves, houses, hammocks or bridges. In addition to their functionality, these items are quite beautiful and enrich the interior. And the happy kitty gets her own mini-gym, where she can throw out excess energy. However, the cost of such products is quite high. You can make these things yourself. A DIY cat ladder is quite possible with minimal skill in working with carpentry tools.
Shelves for cats
The choice of product design depends on the size of the apartment. If the room is small, then 1-2 wall shelves are enough. If you have several fluffies, and the area of the apartment allows, then you can arrange a real mini-complex for the animal.
Important! Don't make the surfaces of the shelves too smooth, otherwise a pet falling on your head will become a common occurrence.
Place shelves around the perimeter of the room, at such a distance that there is enough space for a jump. Then the furry mischief maker will be able to travel along the shelves without going down to the floor.
Treat your cat with a homemade ladder
Every owner of a four-legged furry purr watched his pet climb up the sofa, jump onto the closet, window sill, and climb along the wall carpet to the very ceiling. Any cat likes to climb higher to be alone, to be in a calm environment, to watch all the activities happening below, or just to take a little nap.
You will not be able to prohibit your pet from such ascents, and you should not do this. The ideal option is if you make a special ladder for your cat.
Note to the home handyman
There are many materials on sale that are suitable for making such products. The costs will be minimal:
- Cardboard cylinders left over from selling linoleum are great for making posts and columns.
- And to make a cat house, it is advisable to have a sheet of plywood or chipboard.
- To make it comfortable for the animal to climb, it is advisable to cover the products with carpet or thick fabric. In addition, they look much more fun and elegant. You can combine a scratching post and a cat house in a single complex.
Important! For a small apartment with very little space, a good solution would be to combine an ordinary bookshelf and a cat bed. In this case, the shelves need to be placed in the form of a “ladder” so that the domestic animal can move freely.
Internal staircase structure
It is worth noting that cats have a love for tall pieces of furniture from birth. Deprived of the opportunity to climb trees in human housing, the animal replaces this game by climbing furniture. Most owners have to come to terms with this by default.
But if the constant fall of books and small items left behind from the shelves of the closet begins to bother you, you can build a suitable climbing machine for your pet on your own. This design is usually fixed near the wall or even on the door - in this case it does not affect the interior and does not interfere with opening the door.
- To make a staircase you will need a wide board to act as a base, not long but wide pieces of wood to serve as shelves, soft fabric for covering, like faux fur or sheepskin, and a cord of sisal. These materials perfectly replace the structure of a real tree, where there is rough bark on which you can sharpen your claws, small and large branches and sufficient distance between the branches so that the cat can warm up well.
A ladder for a cat must have a certain strength, so options like rope structures, and especially nets, are not suitable.
The instructions for making the structure are very simple.
- Each “step” is covered with sheepskin or fur. Preferably on both sides: this way the material will stick better and look more aesthetically pleasing.
- Places of fastenings are marked on the base board. It is advisable that the “steps” be placed on different sides of the base alternately, otherwise it will be much more difficult for the cat to climb up.
- The shelves are being nailed down. For reliability, the fastening can be duplicated with metal corners.
- The base is covered with sisal rope. The cat will probably want to sharpen its claws, but if the claw can get stuck tightly in a tree, then, if it gets stuck in the rope winding, the animal will be able to free itself.
- The finished structure is fixed to the wall or sash. You can install the structure next to your “favorite” cabinet. The photo shows the finished staircase.
External staircase
Most often, owners of apartments on the first floor resort to its services. Opening a window is much easier and faster than taking your furry pet for a walk. In fact, such a structure can be installed on the second, third, and even on the fifth floor, if the owners of the home on the lower floors agree to such “decoration” of the wall.
Where to begin?
Before you start work, you need to decide on the dimensions and shape of the product. If the DIY cat shelves for the wall are intended only for the pet, the task is greatly simplified. The shelf can be made from natural wood or chipboard. In the latter case, you don’t have to do anything special. They will cut the sheet for you and glue the edge where you purchased the chipboard. All that remains is to connect the parts using confirmations and hang them on the wall.
Important! This option has one drawback - the material is sold in sheets, so there will be a lot of waste, and the costs will be high.
If you make wooden shelves for cats with your own hands, then you will take as much material as you need, and the consumption will be much more rational:
- Cut the board into pieces of the required length.
- Connect the parts with self-tapping screws, confirmats, or use special wood glue.
- After the structure is assembled, varnish or paint it so that the shelf fits into the interior.
- You can hang the finished product on the wall using dowels or brackets.
- A hanging ladder can be made from furniture slats, cut into pieces of various lengths, and ordinary rope.
Important! To ensure that the lamella pieces are at the same distance, you can tie knots in the rope or use large beads and nuts as limiters.
Detailed job description
List of necessary materials for the kitty corner:
- rectangle made of fiberboard (40*122 cm);
- rectangle made of chipboard (44*61 cm);
- 2 rectangles made of chipboard (55*44 cm);
- rectangle made of chipboard (44*30 cm);
- wooden slats - 7 pieces (3*4*37 cm);
- pipe with a diameter of 110 cm, length 60 cm;
- 2 wooden blocks;
- rope diameter 11 mm, 15 meters in length;
- thin fabric or rope for an inclined climbing frame;
- self-tapping screws;
- 2 pieces of rectangular foam rubber (44*30 and 33*36 cm);
- heat gun;
- faux fur (2 square meters);
- toys;
- jigsaw;
- saw;
- screwdriver;
- drill;
- compass;
- stapler for furniture;
- roulette;
- sharp scissors;
- sandpaper;
- pencils or chalk.
Related article: Knitting a beautiful warm shawl for women: pattern with description
First you need to cut out rectangles of the required size from fiberboard and chipboard. In the rectangles that are set aside from the wall, make truncated circles with a radius of 26 cm. To do this, draw a figure with a compass, which will then be cut out. It is best to make drawings on paper in advance.
We only need one circle. To enter the house on the right, make a circle. Dimensions: 21 cm in diameter.
Then draw three circles, each with a diameter of 5 cm, to create an imitation of a cat’s paws, as in the photo:
Next, make all the holes with a jigsaw, place the circles one on top of the other, mark seven points on one and the second wall.
Now you need to drill holes in two walls using a thin drill, or screw in a self-tapping screw and unscrew it. Then drill small holes for self-tapping screws on both walls at the attachment points. Saw off seven slats with a rectangular cross-section. Fasten the walls with screws and slats.
Cut out several blanks for the walls from fabric. It is worth choosing a fabric that has cut pile so that the cat does not break its claws.
Then glue the fabric to the walls with odorless glue.
Cover all the holes in the walls with fabric. Place the house on its base. Cut the required amount of foam rubber and glue it in the place where the bed will be. Cover the fiberboard sheet for the roof with your own fabric. Cut two pieces from the same fabric that will be used for the base. Use them to cover the slats from below, gluing the material to the lower slats.
Attach the lid with a furniture stapler. Using small scissors, straighten the fabric that is under the brackets. Cover everything with fabric inside the house.
For a scratching post, take two pieces of a block to strengthen the plastic pipe. Cut two cylindrical blocks from dry wood. Fasten everything with self-tapping screws.
For the bed, cut the base from chipboard in a semicircle. Cut another piece to cover the glued part. Make a circle on the board and put it on the pipe.
Related article: Weaving a vase from newspaper tubes for beginners with video and photos
Next, attach the lounger to the block. Place the house on its back wall and place books, place a pipe. Fasten with self-tapping screws, making the necessary recesses first. Decorate the lower part of the pipe with fabric. Place foam rubber on the bed with glue.
Use a stapler to attach the toy rope to the bed. Attach a toy to the other end. Cover the bed with fabric and glue fiberboard to the bottom. Wrap the pipe with rope.
Glue with fabric to both ends. Wrap a rope around the middle of the board. Connect all parts of the complex. Ready!
Instructions for making a house for two cats
The family has two cats. The older cat is the aggressor and the younger one is more active. Therefore, the design was designed so that the youngest could hide on the highest platform, but the elder, due to his weight, could not get there. They decided to place the house high, since both cats prefer heights. They made it larger in size so that both individuals could be there at the same time.
Source material and results of labor
For this design, thick furniture plywood (12 mm) measuring 75*50 cm, timber posts 50*70 (4.2 m), jute-based carpet - 1*2.5 meters, 20 meters of rope were purchased. Fasteners - corners. For the house - 15 * 20 mm, for attaching platforms - 40 * 45 mm, 55 * 20 and 35 * 40 - for insurance, and a couple of large ones - for attaching to the wall.
We prepare the platforms and attach them to the poles
There are three pillars in the chosen design: one is 220 cm, the second is 120 cm and the third is 80 cm. They will be attached to a base made of plywood sheet. The pillars should be placed on the base so that the longest one is closest to the wall. To avoid confusion, when marking on a sheet of paper, using a ruler and pencil, we first drew a stencil on paper, on which the location of the pillars relative to each other was marked. The markings for installing the pillars were transferred from the finished layout. They were fastened with long nails through the base (4 pieces each), drilling holes of slightly smaller diameter in the plywood. Then they were secured on the outside with corners 55*20 for the large post and 35*40 for the smaller ones.
Making a ladder for cats from simple scrap materials
For the stairs we will need plywood, a shovel handle or rake, carpet, rope and self-tapping screws. The tools we will need are: a jigsaw, a construction stapler, a screwdriver and a drill with a drill bit.
We begin production by cutting out two sidewalls of the staircase with the desired height and shape.
We wrap the workpiece with carpet and secure it with a stapler. If the side edges have a complex shape, then we start cutting from the carpet. Since it is precisely from this stage that we can make the necessary reserve.
We cut the steps from a cutting, in our case it was a shovel handle. We screw the steps to the sides with self-tapping screws.
After this you can wind the rope. Our staircase is ready.
Now we will tell you how to make a house for a cat. First, let's decide on the necessary materials and tools. The materials we need are: plywood, hardboard, carpet, soft or fluffy material, foam rubber and timber. Fluffy material can be replaced with faux fur. We will need a jigsaw, a furniture stapler, a screwdriver, and a drill.
We start with choosing sizes. We choose very roughly, paying special attention to ensuring that the house is as comfortable as possible for the cat. We draw the base for the house on plywood and cut it out. The base should be oval shaped and not have any corners.
We cut out a strip from hardboard. The width of the strip should be equal to the height of the house, and the length to the perimeter of the house. If you do not know the exact dimensions, then it is better to make the strip a little longer.
The next step is to cut strips from the block, the length of which is equal to the length of the house. In total you will need about seven pieces. For example, I made the back wall from plywood and installed four racks.
Let's move on to assembling the house. And let's start from the top of the house. We take two bases and assemble them into a frame. We install all the bars. The distance between them should be the same.
We take hardboard with a hole and wrap the frame around the house. Remember that the hole must be in the place in which you intended it. Start wrapping it from a single corner. Don't forget to fix it with staples on the bars.
The frame of the house is ready, all that remains is to decorate it. We use fur on top, cut out foam rubber and fur with a reserve, put foam rubber and secure the fur. Don't pull the fur too tight.
Wrap the carpet around the side and secure with staples. For greater beauty, you can finish the top edge using an overlocker and secure with thread.
The house is ready.
Types of complexes
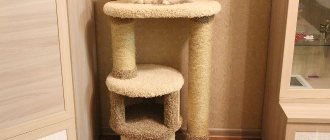
The complexes are the most expensive and at the same time expedient purchase for your graceful, handsome man. Such adaptations are always made taking into account three characteristics of cats - the instinct of a hunter, the love of climbing in high places and the absence of boredom. There are the most original and unexpected combinations of complexes. They can consist of beds, scratching posts, platforms and shelves, steep stairs, and there must be a house in it. All this makes up a complete complex for entertaining cats.
The more complex and higher the device itself, and the greater the number of options for placing parts, the longer the interest in the complex of your home hunter will be. For example, Pet Salon, Trixie and others, it would seem, take the very essence of the cat as the basis for various complexes. The Catrix product is a product of the global market, boasting unique complexes in terms of convenience and functionality. Of course, the manufacturers themselves position it as a scratching post; in fact, it is quite possible to classify it as one of the most impressive and versatile gaming systems.
For the owners, such a complex may be reminiscent of a Lego set, since it is assembled using carefully thought-out parts.
Views
- A simple and reliable DIY metal detector - 201,912 views.
- DIY microwave oven repair - 187,730 views.
- Simple DIY metal detector - 183,532 views.
- Charger from a computer power supply. — 181,025 views.
- Car chargers. Scheme. Principle of operation. — 155,925 views.
- A simple and reliable thermostat circuit for an incubator - 144,444 views.
- Simple automatic charger - 110,765 views.
- DIY moonshine still - 109,818 views.
- How to change the USB connector yourself? — 102,467 views.
- Variety of simple circuits on NE555 - 102,102 views.
Features of the device
A play complex for cats is, in essence, a house for a cat and a scratching post at the same time. It is called a complex because these parts are located together. Why do you need a cat entertainment complex? Such a device in a city house or apartment is relevant and convenient for both the owner and the animal. The fact is that cats love to sharpen their claws, so expensive wallpaper, interior decoration, wallpaper or other interior items can be used for important cat business.
When you buy a play complex for cats, you also get a place where your pet can throw out accumulated energy. After all, such a device has a large number of places where the animal can run and jump. Outdoor games are essential for a cat's health. And together they will be able to maintain the normal functioning of the cardiovascular system, endocrine region and muscle tone. Moreover, this device can create ideal conditions for the full and harmonious development of your mustachioed handsome man in accordance with the norms and age characteristics.


