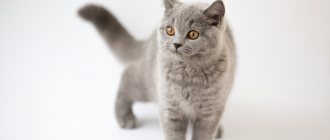
It’s rare that an animal pleases its owners with absolute health and never gets sick. And no matter how much you would like to visit a veterinary clinic solely to vaccinate your pet, sometimes they require surgical intervention.
The most common operation now is sterilization and castration of cats. Uncastrated cats, especially those who were given hormonal drugs, suffer from mastitis, cystosis, purulent pyometra (purulent inflammation of the uterus), hydrometra (fluid formation in the body of the uterus), mammary cancer, tumor diseases of the uterus and ovaries. All these conditions threaten the cat's life and require immediate surgical intervention. Operations are also performed for fractures, ruptures of internal organs and for other reasons.
The main question after the owners have taken the animal from the veterinary clinic is how to care for it now? In addition to injections, tablets and ointments for treating stitches, the cat needs a protective collar.
What is a safety collar?
A protective or Elizabethan collar for cats is a means of barrier therapy, a veterinary device that limits the animal’s mobility and prevents it from damaging the integrity of post-operative sutures by gnawing, licking or scratching. It also prevents you from licking external preparations from the body or scratching damaged areas (bite marks, burns).
A properly selected protective collar for cats fits comfortably on the animal, does not interfere with its movement, eating and drinking, while limiting access to wounds, stitches on the body and limbs.
The only discomfort with a well-chosen and put on collar is the inability to lick yourself. Cats are clean animals and may be concerned about leaving scent marks. But this inconvenience is nothing compared to broken stitches, drug poisoning and damage to healing wounds. So the animal will have to be patient.
Collar - protection for dogs: do it yourself
Collar - protection for dogs: do it yourself
The life of pets is filled with a variety of events. Sad moments often happen to them. Sometimes it happens that the dog requires surgery or, as a result of a fight in which your pet took part, he received a wound and now he should not be given the opportunity to lick the wound. In addition to this, there are many other situations that occur in a dog’s life. If your pet's health is damaged and it requires treatment, then in order for it to be carried out correctly, it is necessary to use a protective collar. You can find this accessory for dogs in any pet supply store. If you don’t want to spend money on purchasing this item, then you can easily make it yourself. How to make such an accessory at home is what will be discussed in this article.
Features of the protective design of a dog collar
A protective collar designed for dogs should be considered as part of restrictive therapy. The use of such an accessory allows you to prevent your pet from getting damaged in the form of scratching and biting. Thanks to the use of this item, you can significantly increase the efficiency of wound healing in your dog. Veterinarians quite often prescribe just such restrictive devices. Their wearing is prescribed in cases where, upon examination of the animal, diseases of a dermatological nature were discovered. In addition, veterinarians prescribe such devices after surgery on a pet. In addition, there are many other cases in which such an accessory is prescribed for a pet.
It is often not a joy for a pet to be in the clinic. For this reason, in order to ensure that the dog spends as little time in the hospital as possible, the owners decide to purchase an accessory such as a protective collar. This prevents the pet from touching its wound. He won't be able to bite or comb it. As a result, this has a positive effect on the wound healing process. Damage heals faster, which contributes to the pet’s rapid recovery. In addition, thanks to the protective collar, the risk of poisoning from drugs that veterinarians often use to treat skin on damaged areas is reduced.
If we talk in detail about such an accessory as a protective collar for dogs, it should be noted that its appearance is a cone, the main feature of which is the presence of a trimmed top. The materials used to make this accessory are plastic and nylon. In addition to them, cardboard can also be used. One of the main advantages of such an item is that when such an accessory is put on a pet, it does not create any obstacles for it to eat. If you make some efforts and are able to accustom your dog to a protective collar, then you will not have any problems with your pet. He will feel comfortable wearing such an accessory. Over time, the pet will begin to perceive this object as a familiar thing, and will not be nervous when such a protective collar is present on its head.
Making a protective collar for dogs yourself
If you need an accessory such as a protective collar, then you don’t have to run to the pet supply store and buy it. After spending some time and putting in some effort, you can make it yourself. At the same time, by doing this, you can make an accessory that will be optimal for your dog. Note that when it is made, it is worth focusing on the breed of the pet. In principle, each owner can make a protective collar of absolutely any size, starting with a small one designed for Chihuahua dogs and ending with voluminous accessories that can be used on shepherds or bulldogs.
If we talk about the choice of materials for the manufacture of a protective collar, it should be noted that it is not limited in any way. Therefore, if you look closely, you can easily find items in your home that may be suitable for you to create this accessory. Some people use buckets made of plastic to create this item. Some create the collar using x-rays as the base material. There are dog breeders who take old canisters and adapt them to this dog accessory. Some people use a material such as cardboard. Also, a tablecloth made of high-density fabric may be suitable for creating such an item. In general, there may be a lot of things in the house, subjecting them to certain manipulations, you will ultimately be able to get the accessory you need. If you are the owner of a small pet, then when creating a protective collar it is best to choose a softer material. If a large animal lives in your house, then the material should be quite dense so that the pet cannot get to the wound and does not begin to scratch it, aggravating its situation. By choosing the right material to create a protective collar, you can create a comfortable and reliable accessory that will ensure a faster recovery for your pet.
Materials and tools for making a dog collar
If you have set yourself the goal of making a protective collar for your pet at home, then, of course, during this work you will need certain tools and material from which the accessory itself will be created.
It is best to use cardboard as the main material, or you can opt for plastic. You need to find it in your home in advance before starting work. If you don’t find it, then you should buy plastic products or cardboard in the store. If you have some other suitable material at home, then you should prepare it before starting work.
Regarding the tools for creating a protective collar for a dog, you will need scissors, and in addition to them, tape. As an alternative, you can use a stapler. It is also necessary to prepare soft materials in advance or find an old collar.
Step-by-step instruction
If you decide to make a protective collar for your dog on your own, you don’t have to worry; it will take you very little time to complete the work to create this accessory.
The first step in making an accessory is taking measurements. You need to measure the diameter of your dog's neck. This will be the starting point for creating the drawing.
After the measurements have been taken, you need to draw a circle on the material that you have chosen to create the protective collar. Note that when drawing a radius, the circle you create should be significantly larger than the actual diameter of your pet's neck. In order for the created drawing to be as correct as possible, you should use a compass when creating a circle. If you don’t have such a tool at home, then in order to draw the most accurate circle, you should use a plate that will be slightly larger in diameter than your dog’s neck.
Next you need to draw the outer circle. Note that the distance between the outer and inner circles should be 5 centimeters less than the length of your pet’s muzzle. By complying with this requirement, you will ultimately be able to create an accessory that your dog will not experience any discomfort when wearing.
The next step is to cut out the outer circle. Next you need to cut out the inner one. In order to do this, you need to make an incision in the center.
Then you need to pick up tape or a prepared stapler and attach the sides of the collar. To do this, they need to be superimposed on each other. As a result, you will end up with something similar to a cone with the top cut off.
After this, you need to try the collar on your dog to see if it is comfortable for your pet to wear.
Then you need to make short vertical cuts along the rim of the middle hole.
Next, the old collar must be placed on the headband, after which the cuts must be tucked in and then secured. To do this, you can use the tape or stapler you have at your disposal.
The subtleties of making a collar for a dog
Particular attention must be paid to ensuring that you do not have any sharp corners or surfaces on the created collar collar. Otherwise, in the process of using the finished accessory, they can lead to injuries to your pet.
Another important point: two fingers must fit freely between the neck and the collar. If this condition is met, then you don’t have to worry; wearing such a protective collar will be quite comfortable for your pet.
If you cannot find a collar at home that is suitable for use as part of a protective collar, then you can easily apply various tourniquets or use a suitable fabric.
If, when creating a protective collar, you decide to use a protective collar that is made of cardboard, then its service life will not be long. However, you have the power to extend its operation. To do this, you need to take the tape you have and wrap it around the surface of the future collar. In this case, saliva and water that gets on it will not soak the cardboard. This means it will serve for a longer time.
Why does a cat need a collar after surgery?
A cat collar is needed in the following cases:
- When the animal has undergone surgery, especially abdominal surgery. For good healing, the sutures must be dry and intact, but a cat with a wet and rough tongue or sharp claws can damage them. Nature does not provide for such a complication as surgery, so the cat instinctively strives to lick the sore spot, “scratch” the veterinary drug applied to the suture, especially if it has an odor.
- When the cat underwent castration. Although he does not need stitches, he may also damage the incision site, lick off the antiseptic powder, and cause bleeding at the surgical site.
- When your cat's ears hurt. She will try to scratch them with her paws or on objects. In this case, the ears will be constantly inflamed, swollen, and the applied drugs will be mechanically removed.
- When the cat’s body is treated with drugs for external use: against ecto- and endoparasites, antifungal or antiseptic. Licking them from the skin and fur, firstly, will negate the healing effect, and secondly, can lead to poisoning. In kittens and small animals, intoxication develops so quickly that it is not always possible to deliver the animal to a veterinary clinic.
Choosing the right cat collar
When choosing a collar, pay attention to the size of the special device. Depending on the width of the brim, there are the following sizes for cats:
- No8 (8 cm).
- No10 (10 cm).
- No. 12 (12 cm).
The collar should not be too loose or tight. For example, an 8-cm model is suitable for kittens and young cats, No. 10 for medium-sized cats, and a 12-cm model for large cats.
If the collar is too loose, your pet will take it off without any problems and will try to do it in your absence. If the cone comes off, it will not only not perform its function, but will also interfere with the cat’s movement.
Too massive, heavy models cause discomfort and interfere with coordination of movements. The cat will show dissatisfaction, trying to remove such protection from itself.
If the collar on the animal's neck is excessively tightened, this can lead to hypoxia (oxygen starvation), suffocation, and poor circulation.
A cat collar should not have a strong specific (chemical) odor. In this case, allergies, intoxication, and poisoning may develop.
When buying a collar, take into account the individual parameters and physiological characteristics of your pet.
You can purchase a protective collar for your cat at the veterinary clinic where castration was performed, at pet stores or veterinary pharmacies. But the cost of the collar is quite high, given the short and infrequent period of use. In addition, in the clinic the choice of models is quite limited and, as a rule, you will be offered an option made of thick plastic. Therefore, let’s look at how to make a protective device for your pet with your own hands.
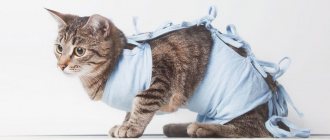
What to choose: a collar or a postoperative blanket?
Cats after abdominal surgery are sometimes put on fabric blankets.
The big advantage of the blanket is that it protects the seam not only from the impact of the cat itself, but also from contact with objects. At the same time, the cat’s movements are not limited, she almost does not feel the blanket and quickly gets used to it. The pet can lick itself and not worry about the smell.
The disadvantages of a blanket are that it gets dirty quickly, and your pet can tear it off with its claws. The movement of the tongue along the blanket at the seam site sometimes leads to damage to the seam, even through the fabric. The blanket cannot be used when treating the animal's body, because it will absorb ointments, sprays and gels.
The advantage of the collar is that access to the site of surgery or treatment is completely limited. The collar will prevent the cat from hiding in a hard-to-reach place where they often hide when they feel unwell.
The disadvantages of the collar are as follows:
- it is less comfortable for a cat to wear than a blanket;
- it can cling to objects;
- It’s also more difficult to pick up than a blanket.
Care and treatment of a cat's wound after castration
Castration, performed in a specialized veterinary clinic by an experienced doctor, is considered a relatively safe procedure for pets. Complications may arise in the postoperative period due to improper care of the injured area.
To eliminate the risks of infection and bleeding, the owner needs to regularly inspect the seam and treat the wound using alcohol-free antiseptics. To eliminate the risk of developing an inflammatory process, it is also recommended to lubricate the operated area with Levomekol ointment.
Treatment of the postoperative wound is carried out until it is completely healed and the sutures are removed. As a rule, cats recover quickly after castration and after 5-10 days the wound heals and the stitches are removed.
If during the rehabilitation period there are signs of complications - bleeding, suture dehiscence, inflammation in the wound area, etc., the owner needs to immediately show the pet to the veterinarian!
When can you remove the collar?
After surgery, a special collar is fixed on the animals’ necks to prevent cats from licking the wound, which can lead to infection and suture rupture. The required period of wearing the collar after castration is at least 5 days. Experts allow you to remove it for a short time, but only if the cat is under the watchful control of the owner.
Cat's diet after castration
After castration, the diet of a domestic cat changes significantly. You will have to remove a number of foods and regular food from your diet. If the pet is used to eating industrial compounds, the owner needs to buy special food for neutered cats.
Since a castrated cat is no longer interested in natural sexual processes, he compensates for sexual interest with increased nutrition, which often leads to obesity and a short life. To prevent the animal from rapidly gaining weight, the owner needs to carefully consider the diet and control the portions served without going overboard with the dosage.
Important rules:
1. The usual portion for a cat is reduced by 20%. Portions are calculated according to the age of the animal. 2. Salt and other types of spices are completely excluded from the diet (they increase the risk of developing urolithiasis). 3. Do not give cats food that is too hot or cold. Food should be warm. 4. Do not allow food to remain in the cat's bowl. After each feeding, the container must be cleared of food debris. 5. Adult cats should not be fed more than 2-3 times a day. 6. During the postoperative period, new food products should not be introduced into the animal’s diet. 7. It is unacceptable to overfeed your pet. 8. Try to feed your cat at the same time every day. 9. The animal should always have clean drinking water freely available.
What and when to feed
Castration of cats is carried out under anesthesia, so the animal should not be fed for the first 5-6 hours after the procedure, which can cause vomiting. After fully awakening, the cat may demonstrate its desire for a snack. In this case, you can give the animal some of its usual food or special food for neutered cats.
In the future, the pet’s diet must be strictly controlled. If the cat is accustomed to natural food, fish should be excluded from the daily menu, as well as foods rich in calcium, magnesium and phosphorus.
Diet of a neutered cat:
· lean meat (not fried) – chicken, rabbit, turkey, beef;
· meat by-products; · vegetables (make up 10-15% of the diet); · boiled porridges from different types of cereals; · eggs (whites); · low-fat fermented milk products. If a cat begins to rapidly gain weight after castration, you need to reduce portions and switch the animal to a dietary diet.
How many hours after can a cat drink?
In the first hours after the surgical procedure, cats should not be given water. 2-3 hours after the operation, when the effect of anesthesia subsides, the cat can be given a little water from a syringe. Upon returning home, it is important to provide the animal with free access to drinking water. You can’t restrict your operated pet’s drinking.
How to put a post-op collar on a cat?
You can choose a cat collar in our veterinary pharmacy!
There are two types of collars:
- The first option is cheaper. This is a semicircle that wraps around the cat’s neck and is fastened with “tabs” inserted into the slots. If the cat does not agree to wear a collar, then one person will have to hold it, and another person will fasten the collar.
- The second option is more expensive, but more convenient. It is attached to a decorative or anti-flea collar: its edges are equipped with Velcro and are easy to fasten. It's easy to put on, even on a reluctant cat alone.
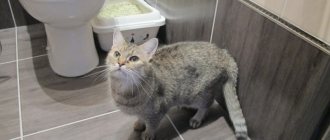
Important! After surgery, the cat must be handled with extreme care: do not squeeze it, do not grab it sharply and do not forcibly pull it out, holding it by the paws, from somewhere in order to avoid damage to the sutures, internal bleeding or an epileptic seizure.
DIY collar: instructions
Making a collar for a cat with your own hands will not be difficult, the main thing is to first make a pattern and take measurements. Measure the circumference of the neck, the length from the neck (collar area) to the tip of the nose plus 4-5 cm (collar width). Using the measurements taken, make a pattern that should have the shape of a bagel. Its width and height are selected individually, taking into account the size of the pet.
You can take the finished model as a basis. For materials, use cardboard, soft plastic, fabric.
For sensitive cats, make a collar from cotton, linen, or materials made from natural fibers. To ensure that the structure holds its shape, fabric, cardboard, soft plastic, or any other rigid layer are placed inside. You can glue several blanks together to form a solid cone. The edging sewn along the outer edge will also support the desired shape of the entire structure.
Lacing, braid, and Velcro can be used as fasteners. If your cat doesn't like Velcro and keeps trying to remove it, consider a different fastener. The cat should not remove the collar on its own.
A protective cone can be made from a small plastic bucket, bottle, flowerpots for flower seedlings. The design should have straps that wrap around the cone, fasteners-tongues, and harnesses for fixation. Sew the harnesses from soft fabric so that the edges do not cut into the pet’s neck.
The plastic collar should not have sharp edges that could injure the cat. Wrap the edge with soft material, wide braid.
To dress the cat in a protective structure, draw a cone around the neck. We make the fasteners into the holes, pass the harness ribbons under the collar, bend them and pass them through the slots again.
Wearing rules
The cat needs the accessory after surgery; if worn correctly, it can be removed in 3-5 days.
To prevent the cat from being able to remove the collar, when choosing and purchasing a product, you need to inspect the fasteners and evaluate their reliability. When putting on the accessory, adjust it so that the headband does not tighten the neck, but is not too loose, otherwise the pet will take it off. If your cat has experience wearing a collar, it will be easier to put a neck post on him.
We can recommend purchasing a product made of hard fabric with padding - these models are more elastic than hard plastic ones, but they will prevent licking no less effectively. When wearing a protective collar, the following rules must be observed:
- do not remove the accessory while the animal is sleeping;
- do not leave the cat unattended if for some reason the stand had to be removed;
- do not try to loosen the collar if you can stick a finger between it and your neck;
- If you refuse to feed due to putting on the stand, you will have to remove the object that is bothering the cat only for the duration of feeding (according to the schedule).
It is recommended to encourage animals more often during the entire period of wearing the collar: pet them, talk affectionately, give them treats.